Example: How can I redirect users to a survey page after they log out from my OAuth application in the miniOrange Admin Dashboard?
Scenario:
An admin wants users to be redirected to a specific survey page after logging out of an OAuth application configured in the miniOrange Admin Dashboard.
Steps to Configure:
- Add the Survey Page URI:
- In the miniOrange Admin Dashboard, navigate to the OAuth application settings.
- Add the URI https://www.myproduct.com/survey-page to the “Allowed Logout URIs” field.
- Save the configuration.
- User Logout Process:
When a user logs out, they will be redirected to the specified survey page, provided the OAuth post-logout endpoint includes the following parameter:
https://example.xecurify.com/moas/idp/oidc/logout?post_logout_redirect_uri=https://www.myproduct.com/survey-page
Important Note:
- The URI in the “Allowed Logout URIs” field must exactly match the URI specified in the post_logout_redirect_uri parameter.
- For example, if the admin whitelists https://www.myproduct.com/survey, but the logout endpoint uses https://www.myproduct.com/survey-page, the user will not be redirected to the survey page. The URIs must be identical for the redirection to work.
Case 1: I have an OAuth Application with branding configured, but I haven’t whitelisted Post Logout redirect URIs in the configuration settings. What should I do?
WARNING! : If you set up branding for your organization, your connections to the configured application will fail. Please update the endpoint URLs in your applications to reflect the new organization-specific URLs.
To ensure your OAuth application is properly configured, you need to whitelist your post logout redirect URIs. Follow these steps:
- Log in to the Xecurify IAM Admin Dashboard.
- Navigate to the Apps section.
- Search for your OAuth configured application.
- Select the action “Edit” to modify the configuration settings.
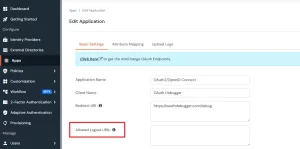
- Locate the “Allowed Logout URIs” field.
- Add your site’s Logout redirect URI to this field. If you have multiple logout redirect URIs, please enter them as semicolon-separated values.
- Click on Save.
Repeat these steps for all your OAuth applications.
Visual Guide: Add/Edit OAuth Application > Whitelisting Post Logout Redirect URIs.
Case 2: I have an OAuth Application, but I haven’t configured branding, and there are no whitelisted Post Logout redirect URIs. What steps should I take?
WARNING! : If you set up branding for your organization, your connections to the configured application will fail. Please update the endpoint URLs in your applications to reflect the new organization-specific URLs.
Before you can whitelist your post logout redirect URIs, you need to configure branding for your organization. Here’s how:
- Log in to the Xecurify IAM Admin Dashboard.
- Navigate to Customization and go to “Login and Registration Branding”.
- Locate the “Organization Name” field.
- Enter your Organization/Domain name. This will be used to create your branded URL: <organization/domain name>.xecurify.com/moas.
- Scroll down and click on Save.
- Log out from https://login.xecurify.com.
- Log in to your organization’s branded URL: https://<organization/domain name>.xecurify.com/moas/login using your admin credentials.
Congratulations! Your branding setup is complete. All users will now use this branded URL for logging in.
After setting up your branding, please follow the steps from Case 1 to whitelist your post logout redirect URIs.
Case 3: I don’t have branding or an OAuth Application configured, but I’m using a Logout endpoint to redirect users after logout. How do I proceed?
WARNING! : If you set up branding for your organization, your connections to the configured application will fail. Please update the endpoint URLs in your applications to reflect the new organization-specific URLs.
If you’re currently using a Logout endpoint (similar to https://{sub-domain}.xecurify.com/moas/idp/oidc/logout?post_logout_redirect_uri=) without branding or an OAuth application configured, follow these steps:
- First, set up branding for your organization by following the steps in Case 2.
- Once branding is complete, you can configure an OAuth application and whitelist your logout endpoint URLs. Here’s how:
- Log in to the Xecurify IAM Admin Dashboard.
- Go to Apps.
- Click on +Add Application.
- In the Choose application type section, select OAUTH/OIDC.
- From the application gallery, navigate to the OAuth2/OpenID Connect application and click on it to configure.
- Under Basic Settings, please enter the following:
- Client Name: Name of your application.
- Redirect-URI: This will redirect the user after successful authentication.
- Allowed Logout URIs: This will redirect the user after a successful logout.
- Locate the Allowed Logout URIs field.
- Add your site’s logout redirect URI to this field. If you have multiple logout redirect URIs, please enter them as semicolon-separated values.
- Click on Save.
Need Assistance?
If you encounter any issues during these steps or have any further questions, please don’t hesitate to contact our support team (info@xecurify.com). We’re here to help!