Following the steps below to upgrade On-Premise IdP to the latest version:
- Download the latest version of the Windows Installer from the downloadables section.
- Run the installer, it will automatically detect and install the latest version.
- Navigate to
C:\Program Files\miniOrange Identity Provider\binand open file: miniOrangew.exe - Click on Java tab. Inside Java options, add the following line if it is not present:
-Dspring.profiles.active=redis
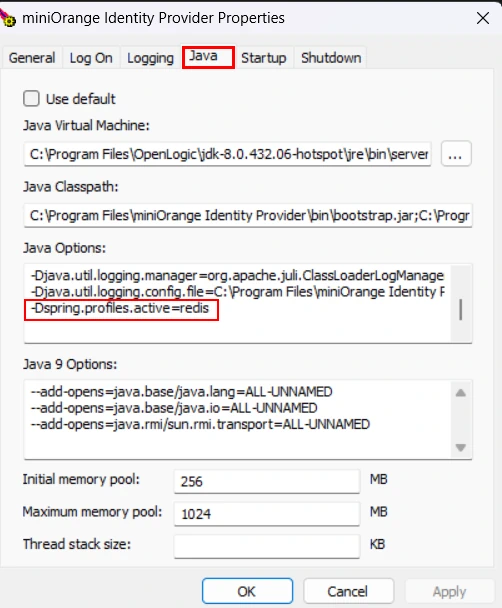
- Click on Ok.
- Navigate to
C:\Program Files\miniOrange Identity Provider\moas\WEB-INF\classes\and open db.properties
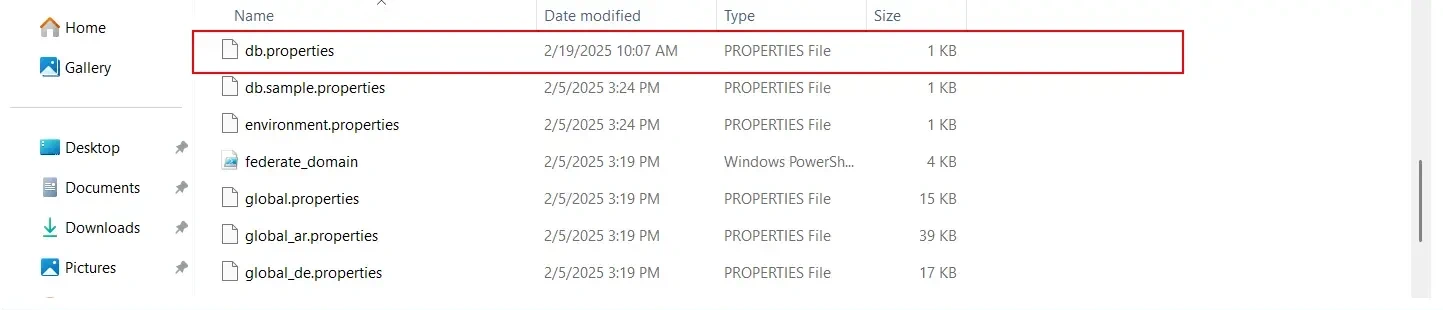
- Take a note of the URL, username and the password as we will need these values for the step below.

- Navigate to
C:\Program Files\miniOrange Identity Provider\services\configand edit the application.properties.
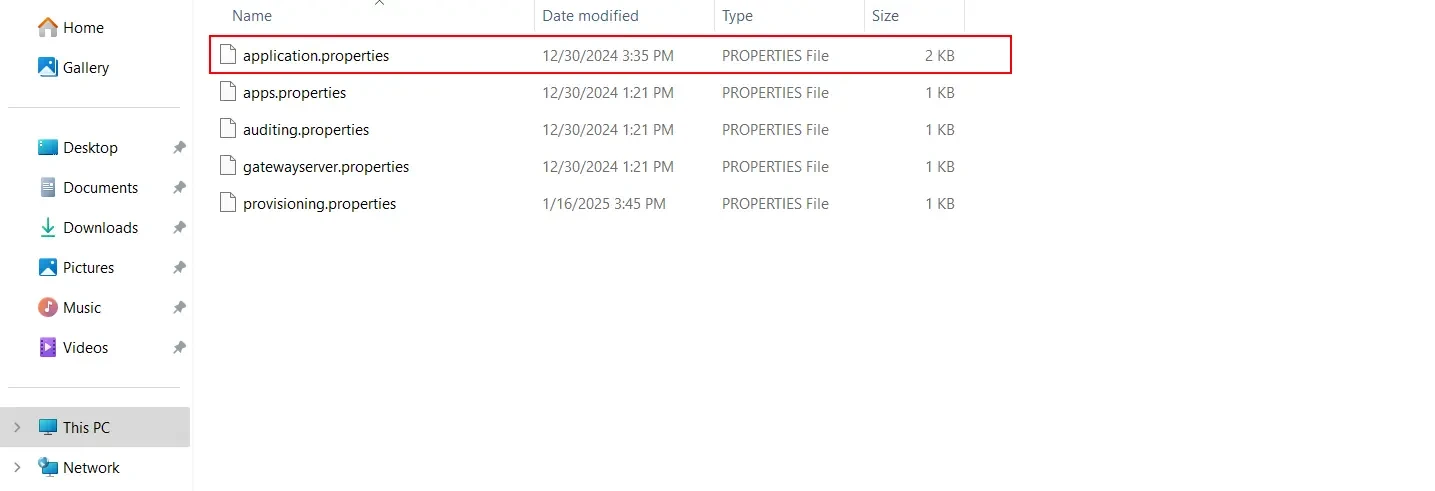
- Update the MO_DB_DRIVER and MO_DB_DIALECT with the proper values. Update the Driver and Dialect database values as shown in the table below.
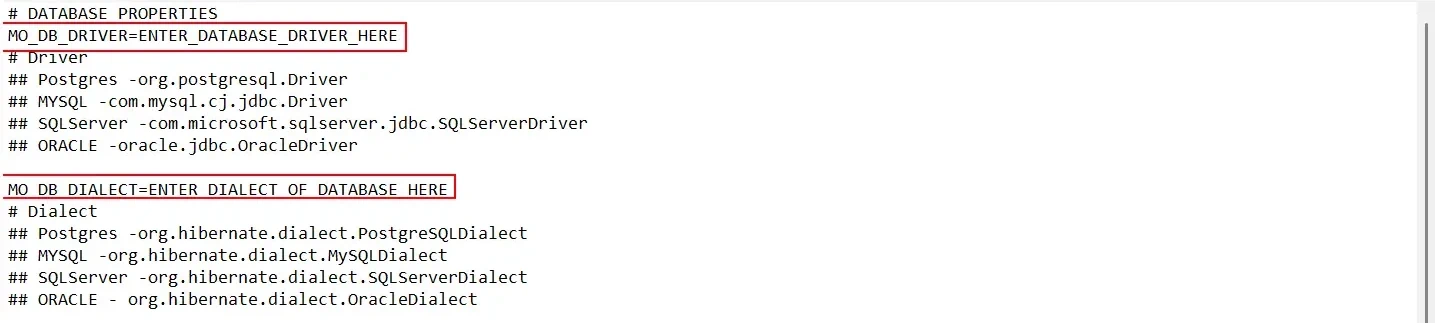
Database Example values Driver Postgres org.postgresql.Driver MySQL com.mysql.cj.jdbc.Driver SQLServer com.microsoft.sqlserver.jdbc.SQLServerDriver ORACLE oracle.jdbc.OracleDriver Dialect Postgres org.hibernate.dialect.PostgreSQLDialect MySQL org.hibernate.dialect.MySQLDialect SQLServer org.hibernate.dialect.SQLServerDialect ORACLE org.hibernate.dialect.OracleDialect - Replace the Primary and Secondary property values with the db.properties values copied from the above step.

Properties Values MO_DB_PRIMARY_URL & MO_DB_REPLICA_URL jdbc.url MO_DB_PRIMARY_USER & MO_DB_REPLICA_USER jdbc.username MO_DB_PRIMARY_PASS & MO_DB_REPLICA_PASS jdbc.password - Save the file.
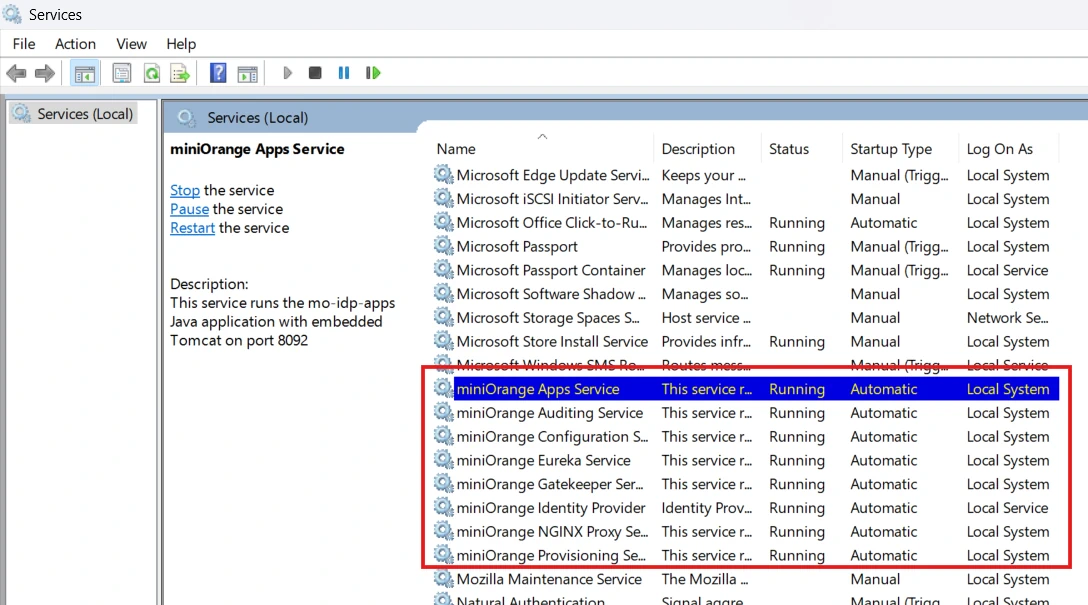
- Now, open Services.msc and check if the following services are present.
- Navigate to your downloaded package from miniOrange Directory.
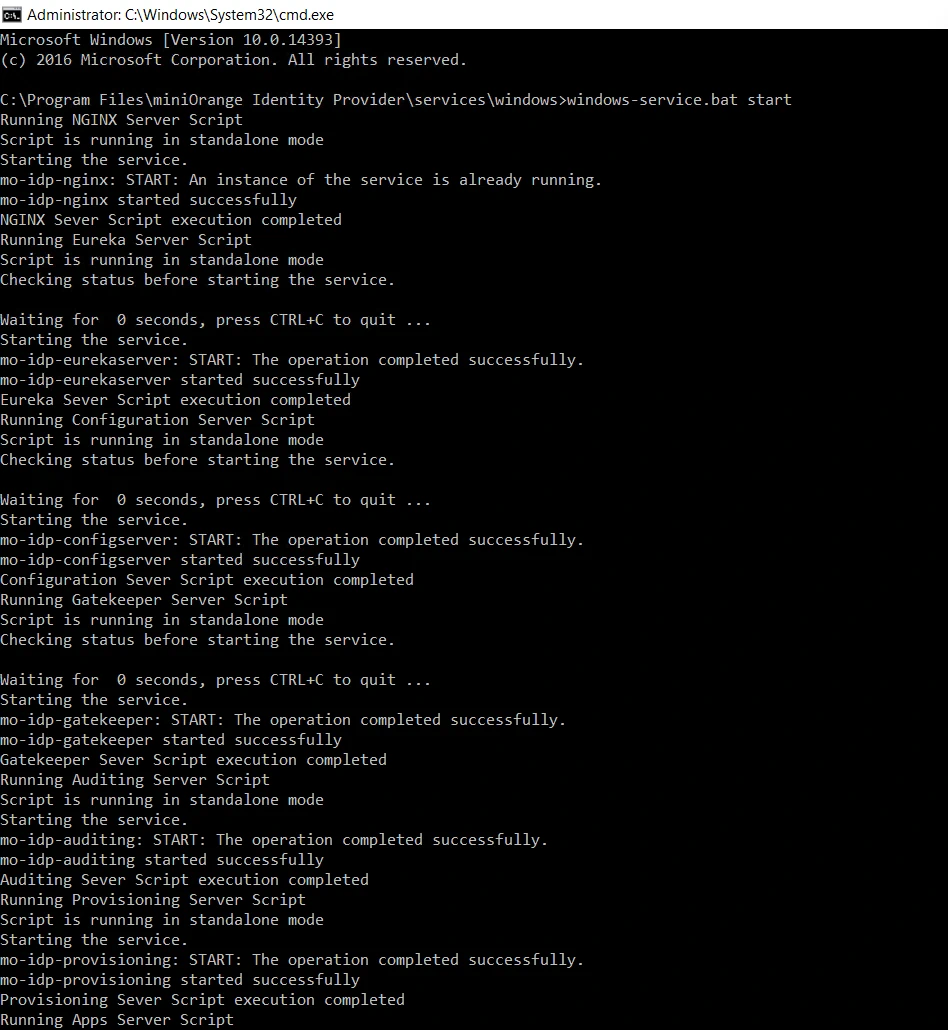
- Navigate to
<miniOrange Identity Provider Folder>/services/windows/ - Open command prompt with admin rights on this location.
- Run the command:
windows-service.bat start(Wait 10-15 seconds for the services to start.)
- The installation will set some of the system variables for you. We will be using system defaults for the StandAlone installation. These Include
- MO_CONFIG_PATH – This is the path where the configurations for the microservices will be saved. By default, the path is <miniOrange Directory\services\config>. This path should be considered for standalone installation.
- ROOT_LOG_LEVEL – DEBUG by default.
- MINIORANGE_LOG_LEVEL – DEBUG by default.
- MO_LOG_PATH – Path where all the log files will live. By default, the path is
<miniOrange Directory\services\logs> - MO_SERVICES_UTIL_TOKEN – (Optional) A manually set authorisation token for critical internal service communication
- Now, you can start all the miniOrange services by navigating to services.msc
- The newer version of minOrange requires Redis and RabbitMQ to be installed on your system.
- Stop the IDP Server.
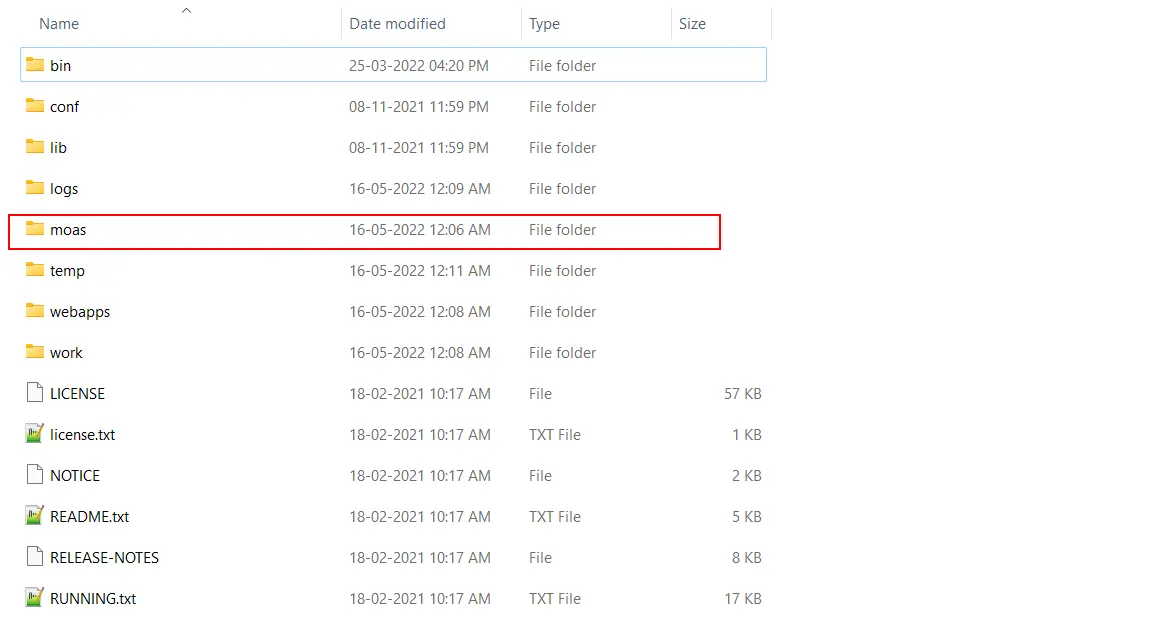
- Navigate to your current Tomcat Installation Directory and take backup of your current moas directory present in <tomcat-root>.
- Take a backup of your database. In case you are using the internal integrated database,then you can take a backup of the data folder present in the <tomcat-root>. In the case of an external database, you can take a snapshot of the DB.
- Now replace the moas folder in the Tomcat Root Directory with the moas folder present in the downloaded package.
- Now copy over the following files from backup moas to the newly deployed moas.
- \moas\WEB-INF\classes\db.properties
- \moas\WEB-INF\classes\license.
- \moas\images\logo.png
- \moas\images\favicon.ico
- Start the Tomcat Server.
Follow the below steps to start the microservices:- Navigate to Tomcat Root of older miniOrange version:
/moas/WEB-INF/classes/db.properties.
- Take a note of the URL, username and the password as we will need these values for the step below.
- Navigate to Tomcat Root folder of downloaded package
/services/configand edit the application.properties.
- Update the MO_DB_DRIVER and MO_DB_DIALECT with the proper values. Update the Driver and Dialect database values as shown in the table below.
Database Example values Driver Postgres org.postgresql.Driver MySQL com.mysql.cj.jdbc.Driver SQLServer com.microsoft.sqlserver.jdbc.SQLServerDriver ORACLE oracle.jdbc.OracleDriver Dialect Postgres org.hibernate.dialect.PostgreSQLDialect MySQL org.hibernate.dialect.MySQLDialect SQLServer org.hibernate.dialect.SQLServerDialect ORACLE org.hibernate.dialect.OracleDialect - Replace the Primary and Secondary property values with the db.properties values copied from the above step.
Properties Values MO_DB_PRIMARY_URL & MO_DB_REPLICA_URL jdbc.url MO_DB_PRIMARY_USER & MO_DB_REPLICA_USER jdbc.username MO_DB_PRIMARY_PASS & MO_DB_REPLICA_PASS jdbc.password
- Navigate to Tomcat Root of older miniOrange version:
- Save the file.
- Navigate to your downloaded package from miniOrange Directory.
- Navigate to
<miniOrange Identity Provider Folder>/services/windows/ - Open command prompt with admin rights on this location.
- Run the command:
windows-service.bat start(Wait 10-15 seconds for the services to start.)
- The installation will set some of the system variables for you. We will be using system defaults for the StandAlone installation. These Include
- MO_CONFIG_PATH – This is the path where the configurations for the microservices will be saved. By default, the path is <miniOrange Directory\services\config>. This path should be considered for standalone installation.
- ROOT_LOG_LEVEL – DEBUG by default.
- MINIORANGE_LOG_LEVEL – DEBUG by default.
- MO_LOG_PATH – Path where all the log files will live. By default, the path is
<miniOrange Directory\services\logs> - MO_SERVICES_UTIL_TOKEN – (Optional) A manually set authorisation token for critical internal service communication
- Now, you can start all the miniOrange services by navigating to services.msc.
- Prerequisites:
- Login to your admin account and go to Settings>>Product Settings. Copy your Server Base URL.
- Take a backup of the miniorange db in your db instance.
- Take a backup of the following files in the server.
- mo-idp-server-*/moas/WEB-INF/classes/db.properties
- mo-idp-server-*/moas/WEB-INF/classes/license
- Go to mo-idp-server-*/bin and Shut down the running tomcat instance. (you can use sh shutdown.sh)
- Steps to upgrade:
- Download the latest version to your linux server and unzip it.
- You will find moas folder inside the uncompressed folder. Replace the mo-idp-server-3.3.*/moas with the new moas folder
- Replace the backups of db.properties and license file on the same path as mentioned above.
- Go to mo-idp-server-*/bin and Shut down the running tomcat instance. (you can use sh shutdown.sh)
- Restart the tomcat instance using sh startup.sh
- Open a browser and go to < Your-Server-Base-URL >/initialize
To know more about the installation process, click here